Why Tauri
Tauri is a new cross-platform toolset for creating GUI applications using web technologies. Its a lighter weight alternative to electron, with low memory usage (a few MB), small binary size (as small as 600kB) and built on newer web stacks than some alternative approaches (i.e. WebView2 not MSHTML).
Another key advantage for me is that tauri is built in rust, so you can write your “server-side” logic in rust, and use a simple “command” API to communicate between the rust backend and the web front end.
At the time of writing this, tauri is at version
1.0.0-beta, rapidly approaching its first “official” release. The documentation is still a little sparse in some respects, so I’m writing this tutorial to share some of my experiences in setting up a tauri and React app.
Sample App
This project is going to demonstrate a small sample App built on a tauri and React stack. We’re going to build a traditional “counter” app, but this time the logic will be run in the tauri backend and the front end will just display the data.
The tutorial assumes a basic knowledge of rust and React.
This tutorial will be broken into a few parts:
- this part, getting set up with tauri and create-react-app (CRA),
- setting up a simple command that we can call from the front end [link]
- wrapping the command in
useSWRto make a generic “invoke” hook, [link] - extending our hook to support multiple counters, [link]
Getting ready for tauri
To start with, we need to install the required dependencies. You’ll need node
and yarn or npm installed, as well as rust. If you aren’t set up already
then tauri provides some pretty good platform specific
instructions.
If you are on Windows, make sure you have WebView2 installed.
Starting with a CRA base
We’re going to start by setting up a CRA app in the usual way.
yarn create react-app counter-app --template typescriptOnce the packages are installed and the process finishes, open up the folder in your IDE of choice.
cd counter-app
code .
I like to start with a clean slate, so feel free to delete everything non-essential from the repo. In this case I deleted:
App.css,App.test.tsx, andlogo.svg
I also replaced the contents of App.tsx with the following.
const App = () => {
  return (
    <div>
      <button>Increment</button> 1
    </div>
  )
}

export default App;
You can then start the app to make sure it runs:
yarn startThe simple app should open up in https://localhost:3000.
Adding tauri
The instructions for integrating tauri can be found here. Firstly we need to install the Tauri CLI locally.
yarn add -D @tauri-apps/cliWe also want to install the Tauri APIs
yarn add @tauri-apps/apiFinally we initialise Tauri using
yarn tauri initJust select all the default options for now. After a few mintues the process
should complete and there should be a separate src-tauri folder where your
Tauri app lives. If you open up src-tauri/tauri.conf.json you can see all the
configuration for the Tauri app. One of the key parts for integrating the CRA
app is this bit:
"build": {
  "distDir": "../build",
  "devPath": "http://localhost:3000",
  "beforeDevCommand": "",
  "beforeBuildCommand": ""
},
This is how Tauri knows how to run your project in dev, and what to do to build your project. Update the build config as follows:
"build": {
  "distDir": "../build",
  "devPath": "http://localhost:3000",
  "beforeDevCommand": "yarn start",
  "beforeBuildCommand": "yarn build"
},
This will ensure that Tauri runs the yarn start command when you run it in
develop mode, and the yarn build command when you build and bundle the app.
I like to add one more shortcut to the root package.json,
"scripts": {
  //...
  "dev": "yarn tauri dev"
}
Now if I want to develop the app in a browser (outside of Tauri) I can run yarn start, and if I want to develop within the Tauri app I can run yarn dev.
If everything has gone to plan at this point you should be able to start the Tauri app in dev mode:
yarn devIt should look something like this:
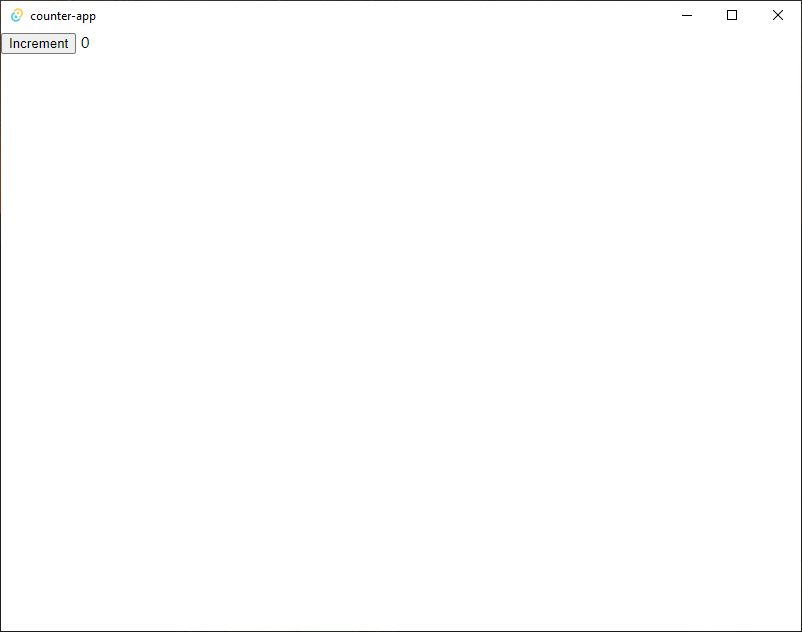
Both the web app and the Tauri app reload when changes are made. You can verify
this by editing our App.tsx from <button>Increment</button> 0 to
<button>Increment</button> 1. After saving the Tauri app should automatically
update.
The code at this point can be accessed on github. Part 2 of the series can be found here