Warning This is a pretty long tutorial! If you just want to see the finished product you can browse the source code or have a look at a live demo
Warning 2 - this tutorial was written for Ember 1.0, and is therefore well out of date.
How about we start with some questions
What is Ember.js?
Ember.js is a client side javascript library which has been in development for quite a while. It recently hit the spotlight as the first stable version (1.0.0) was released.
In a nutshell, Ember helps you create web applications where a lot of the logic runs in the browser and doesn’t necessarily require server requests to function. You may also have heard of it in the same breath as javascript libraries like backbone or angular.
When the user interacts with things like buttons and text boxes on the browser page, Ember updates the DOM directly and (almost) instantly, showing changes directly to the user without refreshing the page. If any server requests are required this can be carried out asynchronously in the background. In effect, Ember takes over the ‘application’ side of the web, leaving the server to act as an API engine, serving and saving data.
Why Ember.js?
There are an increasing number of client side javascript libraries out there, a few of which I mentioned above. There is also a lot of debate into which one you should use and whether you should even be using one. Its fair to say that some of the debates I’ve read recently are a well over the top.
I’m going to avoid this whole issue and simply say that in the past year I’ve tried a bunch of libraries out there and found that I enjoyed using Ember the most. It suits my requirements, is relatively easy to use and seems to have a very structured approach to development within the core team. I think if you want an application which is easy to write and maintain, responds snappily to user input and works using data from a REST API you can do a lot worse than something like Ember. In no way am I trying to claim its the only way to go!
In the end, I suggest you have a go at Ember to see how it works and see if you like it.
How are Ember applications structured?
Ember.js applications use an MVC type structure. In this approach you have
- Models which define the data that is used in an application,
- Controllers which modify, query and edit the data and provide user interactions, and
- Views which display the data and capture user actions
In addition, Ember uses templates to define how views should look in the browser.
Today’s application
There are a lot of TODO tutorials out in the wild, and I’m certainly not going to write up another one. What we’re going to build today is something altogether more exciting, something never before seen in the world of introductory tutorials. Wait for it… today we are going to build a DICE ROLLER.
Hopefully our Dice Roller is going to show a couple of the interesting Ember features in an application which does not require a server backend.
For consuming REST APIs, Ember has a data backend known as
ember-data. I’ve never found that this quite matches my requirements so I’ve always rolled my own. I am unlikely to spend much time discussing this approach as Evil Trout has already done a pretty good job.
So our application needs a few features…
- Input the number of dice and the number of sides into a text box (e.g. 3d6)
- “Roll” the dice and record the number of results
- Draw a pretty (or otherwise) HTML chart of the results
Simple right? Well this is a beginners tutorial after all! :) This means lots of things aren’t going to be covered in this tutorial… some of the major Ember features left out are:
- How to structure the files for a complex or large application
- How to use ember-data
- How to roll your own data access
- Anything not covered below :)
Despite this I think we are going to cover enough to get somebody new to Ember on the right track. Enough talk, lets get coding!
Getting Started
Building the HTML
The first thing that needs to be done is to build an HTML file to serve the application. For starters, this is just a matter of building a basic HTML document with the jQuery, Ember and handlebars scripts included. Handlebars is a templating language which lets you write out data bound templates that are rendered into the browser. Create an index.html file and enter the following:
<!DOCTYPE html>
<html>
    <head>
        <title>An Ember dice roller</title>
    </head>

    <body>


        <script type="text/javascript" src="//cdnjs.cloudflare.com/ajax/libs/jquery/2.0.3/jquery.js"></script>
        <script type="text/javascript" src="//cdnjs.cloudflare.com/ajax/libs/handlebars.js/1.0.0/handlebars.js"></script>
        <script type="text/javascript" src="//cdnjs.cloudflare.com/ajax/libs/ember.js/1.0.0/ember.prod.js"></script>
    </body>
</html>
There shouldn’t be anything too exciting here - we are simply setting up a
single HTML file with the standard head and body sections and including some
scripts. Its important that the scripts appear in this order; Ember requires
jQuery and handlebars and will give you errors if the scripts have not been
included before the Ember script.
If you are running the web page on your hard drive using a file:/// url, you may need to put an http: in front of the cdnjs URLs above.
Create an application
So far so good. Now we need to create and load our Ember application. Lets start
by creating a new file, app.js and including it in our HTML document below the
other script tags:
<script type="text/javascript" src="app.js"></script>Inside app.js, write the following:
var Roller = Ember.Application.create({
    LOG_TRANSITIONS: true,
    LOG_BINDINGS: true,
    LOG_VIEW_LOOKUPS: true,
    LOG_STACKTRACE_ON_DEPRECATION: true,
    LOG_VERSION: true,
    debugMode: true
});
This code creates a brand new application using Ember.Application.create(),
calls it Roller and passes it a bunch of variables inside the {}. These
variables are all about debugging information and should probably be set to
false for a production application. However, as we are just getting started with
Ember lets leave them on for now as their output is quite useful.
If you open up index.html in your browser and go to the developer console
(F12 in chrome) you should see some messages on the console:
Could not find "application" template or view. Nothing will be rendered Object {fullName: "template:application"}
Could not find "index" template or view. Nothing will be rendered Object {fullName: "template:index"}
Transitioned into 'index'
These are debug messages that we asked for in our Application.create call
above. We can see that something is not quite right - Ember can’t find a couple
of templates or views. Its not all bad news though, as Ember has transitioned
into ‘index’. In this case index refers to a Route which we will talk about
more later.
Ok, lets start by fixing some of these log messages.
The application template
Ember uses a lot of convention over configuration. This basically means that when it goes to a URL, it expects a number of objects to exist with very specific names. If it doesn’t find these objects, it can often create default ones.
In this case when we load our application, Ember looks for a handlebars template
called application. This template is loaded for every url or request and wraps
up and displays the entire application. For now, this template can be quite
simple, but when you build a more complex application it can include things like
menus, headers and footers.
Lets write a simple one now. In the body of your index.html file, above the script tags enter the following:
<script type="text/x-handlebars" id="application">
    <h1>Dice Roller</h1>
    {{outlet}}
</script>
This looks a lot like HTML, and it basically is. The important things are that
we have specified type="text/x-handlebars" on our script tag, which tells
handlebars that it should compile everything inside the script tags as a
handlebars template. Ember then looks for the attribute id="application" and
realises that we want this template to be the application template.
Refreshing the page, you should see that the first log message we saw before
should have changed from Could not find "application" to Rendering application with default view, and you should see the heading “Dice Roller” in
your browser window. So we haven’t quite removed any log messages but this new
message is just Ember saying to us “I see you have an application template, but
since you don’t have an application view I’m going to make one for you.” No big
deal, right?
NOTE When you make changes to Ember applications make sure you refresh the page entirely… sounds obvious but if you click on a link in the Ember application the application itself doesn’t get updated from the server.
The only strange thing in this template is the {{outlet}} written after our
heading. This is a handlebars tag - the curly braces tell handlebars to do
something with whatever is inside. In this case, an outlet is where our
application can put other views or templates. We can see the effect of this by
creating another template below the application template in our index.html:
<script type="text/x-handlebars" id="index">
    <p>
        Our content goes here
    </p>
</script>
Save and refresh and you should see that below our heading there is now the text “our content goes here”. What has just happened?
This is convention over configuration working overtime. Ember has loaded up,
looked for the default application template and rendered it. It has then checked
the URL and realised that its in the index resource (no further URL has been
provided - more on this later) and has looked for the index template. Finding
it, Ember has put the output from this template into the {{outlet}} of the
application template. Simple, right!?
Defining URLs (or resources)
You’ll notice that we haven’t actually told Ember about any URLs to provide
yet… its simply guessed that we want an “index” route when we visit
index.html directly and as we haven’t defined one, it has generated one for
us.
“But Will,” I hear you say, “hardly any applications simply use one URL”. How
right you are! Luckily for us, Ember provides a mechanism where complex, nested
and dynamic URLs can be provided. This system is handled by the Router object.
By default Ember generates an index route, and so no further work is required if
we just want a simple resource. In our case we don’t want anything too complex
In Ember you can think of a resource as kind of like the a “page” in static HTML websites.
Configuring a router is dead simple. At the bottom of your app.js add the
following:
Roller.Router.map(function () {
    this.resource("roll");
});
Thats it! Refresh your page… errr, nothing has changed. Well behind the
scenes, Ember now knows about our roll URL and if we ask for it will try to
find the roll template. Lets link up this resource in our index view. Where we
previously wrote “Our content goes here” in the index template, replace it with
the following:
{{#linkTo "roll"}}Start rolling dice!{{/linkTo}}The curly braces tell us that this is another handlebars “command”, but what
does it do? Hopefully linkTo is a bit of a give away. This command generates a
link (using an HTML <a> tag to the resource we have called roll, and puts
everything between the {{#linkTo ... }} and {{/linkTo}} tags inside the
link. Refresh it and see what happens.
A link appears in the index and we can click it to go to the roll template.
Notice that our address bar now has index.html#/roll. This is how Ember knows
which resource to load. Everything after the #/ is a resource name and we can
see here it is roll which we defined in our resources! For more complex or
nestted resources you may see a link like index.html#/roll/1/my-roll. As long
as you have correctly configured your Router, Ember will know how to handle
this.
You can define custom behaviour for Routes such as roll or index which
lets you load specific data or add some complex redirect behaviour (for instance
you could check if the user is logged in and if required redirect to a login
page).
In our Dice Roller application at the moment, its silly that users have to
navigate to the application then click on a link to start rolling dice. Sure, in
a real world application we might just merge everything in the roll route into
the index route and leave it at that. For the sake of a highly contrived routing
example, lets instead redirect any visits to the index route to the roll
route.
Below your Router.map call in the app.js file, add the following:
Roller.IndexRoute = Ember.Route.extend({
    redirect: function () {
        this.transitionTo("roll");
    }
});
The extend part of Ember.Route.extend simply tells Ember we want to create a
new version of the pre-defined Ember.Route object and add some of our own
logic to it. This is akin to basic class inheritance in languages such as
Python, for instance you may view this as something like:
class MyNewRouteClass(Ember.Route):
    """my new route methods follow"""
If you remove the #/roll from the URL and refresh, you shoud see that the roll
route is automagically navigated to whenever we try to go to the index. Sweet!
We’ll come back to routes a bit later on.
Add some user controls
If you looked at the console when we first created our roll linkTo you would
have noticed that Ember could not find "roll" template or view which is
expected as we haven’t defined one. Lets add one now below the index template in
our index.html file.
<script type="text/x-handlebars" id="roll">
    <p>
        Enter your required dice roll below, for instance "3d6" will roll three six sided dice.
    </p>

    {{input valueBinding="rollString" placeholder="Enter your dice roll, e.g. '3d6' here"}}

    <hr>

    <h2>Results</h2>

    {{#each roll in content}}
        I rolled a dice
    {{else}}
        No results yet
    {{/each}}
</script>
There are a few new things here - the {{input}} and {{#each}} tags.
The input tag is a handlebars helper that Ember provides. This renders an
input tag of type text with the given placeholder. It also uses valueBinding
to let the controller know that it should ensure that the controller property
rollString matches whatever is in the text box at all times. The HTML code
generated by this may look a little like:
<input id="dice_roll"
       class="ember-view ember-text-field"
       placeholder="Enter your dice roll, e.g. '3d6' here"
       type="text" />
Great, so what? Well you are right, so far not particularly exciting but stay tuned!
The {{#each}} tag does a forEach on the list or array it is provided. In other
words it does whatever is between the {{#each}} and {{else}} once per object
in the given array.
In this case we have a list of some sort called content and for each item in
that list it prints out I rolled a dice. We can access properties of each of
the items in the block by using roll. We also provide an {{else}} block.
This tells handlebars what to show if there are no items in the content list.
If you refresh the page you will see the input box and text rendered but not much else. Thats because we haven’t hooked up any logic or models to the application yet. Lets do this now.
Adding some models
Our model is going to be very simple, and just define a dice result and a count.
In your app.js file, add the following up near the top, but just after the var Roller declaration:
Roller.Roll = Ember.Object.extend({
    diceNumber: 0,
    totalRolls: 0,
    numberOfRolls: 0,

    proportion: function() {
        var width = 50 + parseInt(400 * this.get("numberOfRolls") /
            this.get("totalRolls"));
        return "width: " + width + "px;";
    }.property("totalRolls", "numberOfRolls")
});
This is a bit of a javascript mouthful but really quite straight forward. Once
again we are calling extend on something Emberish - here the base Object -
and providing some additional information inside the {}. The first three are
simple properties, just some variables that we are storing against this model.
The last declaration - the proportion property - is a bit more complicated but
is where the magic of Ember starts to really show through. Ember properties
are a neat feature that can be used to automatically update the contents of a
model when some other attribute changes. Properties aren’t stored in a database,
but are derived from other attributes of the model itself. In this case, we
can see that after our function we have written
.property("totalRolls", "numberOfRolls")This means that if on a given model the value of either of totalRolls or
numberOfRolls changes, then the proportion property will be updated. Any
user interface elements which depend on the proportion property (we’ll see how
to manage this later) will be automatically updated!
For added confusion we’ve created a property here that returns a bit of CSS that
we will later bind to our DOM element. In this case it returns a width based
on the percentage of total rolls that this dice number represents.
NOTE The property above uses
this.get("variableName");to retrieve properties from the model. In Ember applications we generally need to use this approach for accessing properties rather than simplythis.variableName.Similarly for setting values we use
this.set("variableName", value)instead ofthis.variableName = value
Loading models into a route
By itself, just declaring a model doesn’t actually do anything. We need to tell
our route how to gather together the required models. This is done by
extending the RollRoute in a similar fashion as we did before when we
extended the IndexRoute.
Below your IndexRoute declaration in app.js, add the following:
Roller.RollRoute = Ember.Route.extend({
    model: function () {
        // in a data driven application this could be used
        // to get information from a server.  Here we just
        // declare an empty array in memory
        return [];
    },

    setupController: function(controller, model) {
        controller.set("content", model);
    }
});
We provide two additional methods to the RollRoute, firstly model() which
retrieves (or in this case generates in memory) some models, and a
setupController() method which stores the model information in the controller.
(At the moment our RollController is auto-generated by Ember as we haven’t
defined one).
Notice we have used the controller.set() method. Here Ember calls
setupController with a reference to the currently loaded controller - in this
case the autogenerated RollController - as well as the model that was loaded
using the model() method defined earlier. The observant amongst you will no
doubt notice that in our roll template above we used {{each roll in content}} which should hopefully start to set a few light bulbs glowing!
Refreshing the page again should show that once again nothing above the surface
has changed. Our text box is still sitting there dumbly and we should be seeing
a “No results yet” output. Just for kicks, lets change our model function from
returning
return [];to returning
return [
  Roller.Roll.create(),
  Roller.Roll.create(),
  Roller.Roll.create()
];
Refreshing the page and you should see the output change from “No results yet”
to “I rolled a dice I rolled a dice I rolled a dice”. We’ve used
Roller.Roll.create() to create three instances of our model and passed them to
the controller in an array. Ember has then taken the content property we set
on the controller and used it in our view. Eureka!
If you get this then you have followed along correctly so far! Ok, quickly change it back before somebody gets blinded by Ember’s magnificence.
Connecting up actions
In the last section we accomplished something pretty wonderful. With a few lines of code we set up a route that loads models into memory and displays them in the user interface. Lets take it one step further now and generate models on the fly based on user input.
Coming to the rescue here are Embers actions. These are kind of like event
handlers, in that they link up things like click events on buttons or links to
functions in your controller. Ember does also provide a way to directly handle
DOM events (such as onClick) in views, we’ll cover those right at the end.
To see how this works, we need to actually define a controller. Firstly, however
lets add a little bit to our roll template in index.html. Replace the current
template with the following:
<script type="text/x-handlebars" id="roll">
    <p>
        Enter your required dice roll below, for instance "3d6" will roll three six sided dice.
    </p>

    {{input valueBinding="rollString" placeholder="Enter your dice roll, e.g. '3d6' here"}}
    <button {{action "rollDice"}}>Roll Dice</button>

    {{#if errors}}
        <div class="errors">
            {{errors}}
        </div>
    {{/if}}

    <hr>

    <h2>Results</h2>
    {{#each roll in content}}
        <div class="roll">
            <span class="roll-number">{{roll.diceNumber}}</span>
            <span class="roll-result" {{bindAttr style="roll.proportion"}}>{{roll.numberOfRolls}}</span>
        </div>
    {{else}}
        No results yet
    {{/each}}
</script>
You can see we’ve used an {{#if}} tag (which does exactly what we would
expect) to show errors if any were found - we’ll use this in our controller.
We’ve also improved our output for rolls in the {{#each}} block. We added a
div and two spans to show our values.
We’ve also used a tag {{bindAttr ...}}. This tag lets us bind an attribute of
an HTML tag directly to a property of our model. Here we are using it to set the
width of the <span> element based on the proportion property, which is in
turn based on the percentage of total rolls this number represents. Because
Ember automatically updates the rendered templates whenever the underlying data
changes, if we make changes to content on our controller then the width of
this span will update automatically. Thats neat!
Ok, enough messing about, lets get on to our controller. This will take quite a
bit more code so bear with me for a moment or two. At the bottom of the app.js
file, add the following:
Roller.RollController = Ember.Controller.extend({
    rollDice: function () {
        var roll = this.get("rollString"),
            content = [],
            rolls = 0,
            sides = 0,
            errors = "",
            i, rnd, roll_parts;

        // check if anything was typed in the text box
        if (roll === undefined) {
            this.set("errors", "Please fill out the text box!");
            return
        }

        // split up the string around the 'd'
        roll_parts = roll.split("d");

        if (roll_parts.length !== 2) {
            // check if we had a "d" in our text (i.e. its correctly formatted)
            errors += "You need to enter a value in the format 'xdy'.  ";
        } else {
            // then split up and parse the required numbers
            rolls = parseInt(roll_parts[0]);
            sides = parseInt(roll_parts[1]);

            if (isNaN(rolls) || isNaN(sides)) {
                errors += "Rolls and sides must be numbers.  ";
            }

            // generate the dice rolls if we haven't found any errors
            if (errors.length === 0) {
                // generate all the models
                for (i = 0; i < sides; i++) {
                    content.push(Roller.Roll.create({
                        diceNumber: i + 1,
                        totalRolls: rolls
                    }));
                }

                // now roll all the dice
                for (i = 0; i < rolls; i++) {
                    // roll a dice
                    rnd = Math.floor(Math.random() * sides);

                    // increment the required model
                    content[rnd].incrementProperty("numberOfRolls");
                }
            }
        }

        // update the content
        this.set("content", content);

        // display any errors
        this.set("errors", errors);
    }
});
By now we should be starting to become familiar with Embers extend syntax, but
there is a lot more code here than we’ve seen before. This is our application’s
logic, and most of it is to do with error checking.
I’m not going to go into too much detail as its just plain javascript for the most part, but basically it does the following:
- Gets the input from the text box and checks it is in the right format
- Builds a model for each side of the dice
- Randomly rolls dice and increments the numberOfRolls attribute for the correct model by one using the model.incrementProperty(‘property’) method
- Sets the content of the controller to our new models and saves any errors encountered
Now when you type a valid dice roll into the text box and click the Roll Dice
button, you should see some (unformatted) results appearing below. The key
things to note are that we have used this.get() and this.set() to access
properties on the controller. At the end, we have set the content and errors
properties on the controller and these are the same content and errors
properties we reference in our template. Similarly, in our template we set the
id attribute of our {{input}} to rollString and as a result this is
available in our controller using this.get("rollString").
You can now refresh the page. Try typing the following into the text box and see what you get:
- 1
- 1d
- 1d6
- 2da
- adb
- $#dfgk34j6
- ddd
Thats it! We now have a fully functioning - if a little plain - dice rolling application using Ember. By my count we’ve written about 150 lines of javascript and HTML, which is not too shabby, although we could cut out a bit by merging our roll and index controllers as we discussed above.
Styling the application
Until now we have just gone on using the default, ugly HTML styles. We can
easily provide a bit of beauty to our application by just adding a sprinkle of
CSS in the usual way. Into the head tag of your index.html, link up a
stylesheet:
<link rel="stylesheet" type="text/css" href="styles.css">Create styles.css and paste in the following:
.errors {
margin: 2em;
padding: 1em;
border: 1px solid #A22;
color: #A22;
background: #FDD;
}
.roll-result, .roll-number {
display: inline-block;
margin: 0.2em;
padding: 0.5em;
}
.roll-number {
font-weight: bolder;
min-width: 50px;
}
.roll-result {
background: #03C;
color: white;
text-align: right;
}
input, button {
padding: 0.5em;
font-size: 1.1em;
border: none;
outline: none;
}
input {
background: #EEE;
min-width: 350px;
}
button {
cursor:pointer;
background: #03C;
color: white;
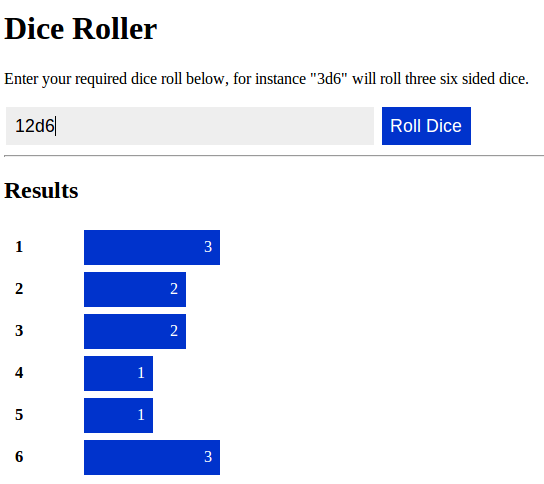
}Now our errors are styled, and when we click “Roll Dice” a nice bar graph will be drawn showing the results. You should see something like the following:
Further Improvements
One annoying “feature” of this application is that when we want to roll some dice we have to click “Roll Dice” every time. It would be much nicer if we could just hit enter when we are happy.
To do this, lets use a custom view which extends Ember’s TextView. At the very
end of our app.js file, insert the following:
Roller.DiceInputField = Ember.TextField.extend({
    keyDown: function (event) {
        var controller, action;

        // check if we pressed the enter key
        if (event.keyCode !== 13) {
            return;
        }

        // call the controllers 'rollDice' function
        controller = this.get("controller");
        action = this.get("action");
        controller.send(action, this.get("rollString"), this);
    }
});
This extends the Ember.TextField (which was already being used by the
{{input}} tag). We have also defined a keyDown function, which Ember
automatically binds to the keyDown event of the field. Inside the function it
checks whether we have hit the enter key (key code 13) and if we have it sends
the rollDice action to the controller.
We have to update our template so that it uses this new view. Simply change the following line:
{{input valueBinding="rollString" placeholder="Enter your dice roll, e.g. '3d6' here"}}to
{{view Roller.DiceInputField valueBinding="rollString" action="rollDice" placeholder="Enter your dice roll, e.g. '3d6' here"}}Conclusion
Thats it! Hopefully this has given you a fair idea of what is possible in Ember applications. If you have any comments, corrections or suggestions then feel free to comment below. Otherwise, get Embering!